I want to start off Football 101 with one of my favorite and one of the most simple schemes around: cover 2. Cover 2 is a defensive coverage scheme that involves two players dividing the field in half and covering the deep secondary. The most famous use of cover 2 was the Tampa Bay Buccaneers of the late 1990’s and early 2000’s. The scheme as a whole was then most often dubbed “Tampa 2” coverage even though it was very similar to what the Pitsburgh Steelers of the 1970’s ran (Tony Dungy, the then head coach of the Buccaneers and one of the masterminds of the Tampa 2 scheme, played defensive back for the Steelers in 1977 and ’78. He also employed the scheme as defensive coordinator of the Minnesota Vikings, pictured above). Cover 2 is used at all levels of the game and has been around as long as zone coverage.
Cover 2 can be employed from all kinds of defensive alignments. However, since we will be focusing on coverage here, I will be diagramming this from a basic 4-3 alignment for simplicity. The image below shows a 4-3 defense and the zones that are covered by each player on the field.
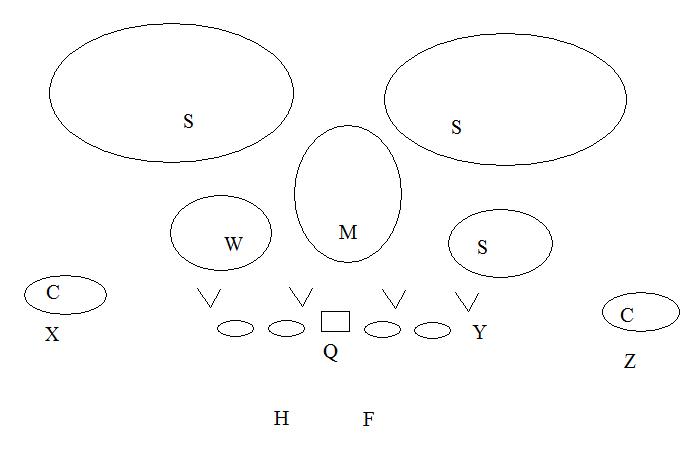
As you can see, the two safeties (represented by each “S” at the top of the diagram), divide the deep field in half, which is where the “2” in “cover 2” comes from. The rest of the field is divided into five short zones that are covered by the linebackers and corners.
On paper this looks great but in reality how does this all work? Like any scheme, cover 2 needs to be executed properly to work and like all schemes is has its weaknesses.
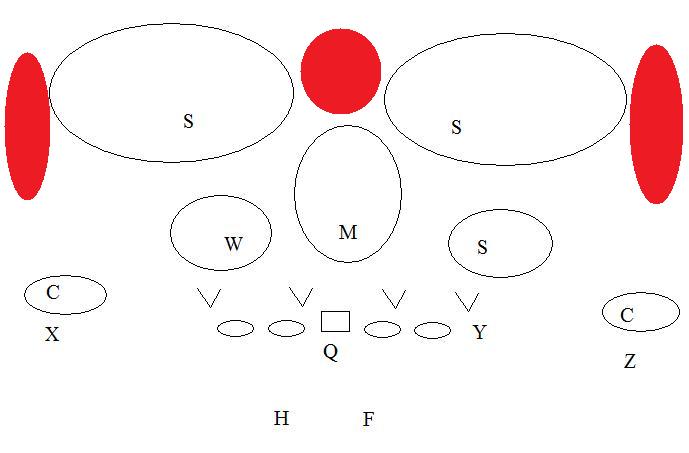
The red areas represent the most dangerous places for a defense when running this scheme. On paper, the deep part of the field is covered by two large ovals but in reality you still have two human beings trying to cover a lot of open field. It would be very hard for the safeties above to read the play and react quickly enough to cover a receiver in the red areas. So what stops them from giving up big play after big play?
The answer lies in how the rest of players cover their zones. Let’s start with the corners:
The cornerbacks (represented by the letter “C”) line up slightly to the outside of the wide receivers and right on the line of scrimmage. What this does is allow them the proper leverage to jam the receiver to the inside. The most immediate threat to the red areas on the outside is a streak up the sidelines. The corner’s main job is make sure this doesn’t happen at all costs! By jamming him to the inside, the corner slows down the receivers route to the sidelines or makes him run the streak closer to the safety. Either way, the safeties job just got a lot easier because he has more time to react to the threat. After that, the corner covers the flats, the shallow area between the hash marks and the sidelines.
The middle linebacker’s (represented by the “M”) job is slightly more complicated than it seems. While he is responsible for the shallow zone in the middle of the field, he is also responsible for dropping back to help cover the deep middle of the field. He may drop as far as 18 yards deep if he sees a threat, even if another receiver crosses into his shallow zone. The reason being is that it’s much easier to rally to a tackle than to chase down a receiver who has beat the coverage deep. This helps the safeties by reducing the threat of a post or streak up the middle of the field, shortening the area they need to cover.
The sam and will outside linebackers (represented by the shallow “S” and “W”) are responsible for covering their short zones but also jamming and redirecting anyone who runs past them. This is a tactic that is used in almost every zone coverage scheme. It has a similar effect to what the corners are doing. By bumping the receiver off his route, he is knocking the timing of the pass play off and slowing him down at the same time.
If everyone does their job in the shallow areas, the deep coverage will take care of itself. Ofcourse, with all the time coaches spend trying to out-think eachother, there are more nuances to it than that.
The first thing corners need to learn how to do is count. No, not like that. They need to count receivers. In any offensive formation, there can be no more than five eligible players to catch a pass (not including the quarterback because he has to throw it). They can be lined up in many ways but all corners need to know how to do is count to three. The receiver that is closest to the sideline on each side of the field is number one. The next receiver in is number two. Number three is the receiver in the middle who they each call number three. Let me show you an example:
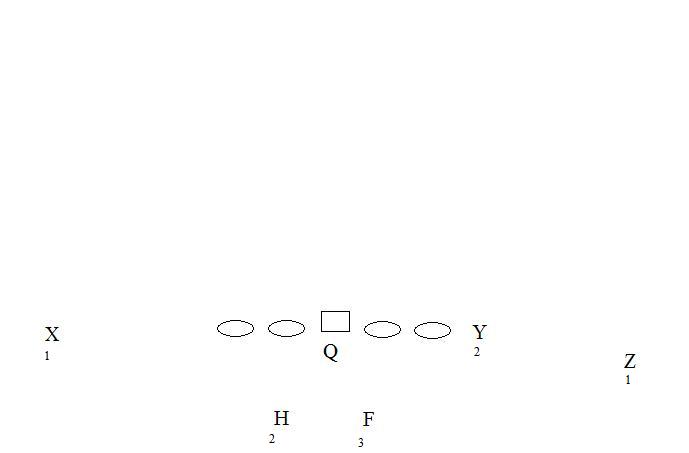
This is a basic pro set with two wide receivers (X and Z), a tight end (Y), and two running backs (H and F). As you can see, both the X and Z receivers are labeled as number one because they are the outermost receivers (closest to the sideline). Number two is the next one in. The corner on the “Z” side has a tight end near him. That is number two for him because he is the next eligible receiver inside of the number one. The corner on the “X” side sees the “H” running back as number two because he is the next closest receiver. The “F” running back is in the middle of the five receivers and both corners count him as number 3. Okay great, we learned how to count receivers but why is this important?
Well, remember how we talked about corners jamming the outermost receiver on their side? Now we know that he is number one. So the corner lines up and pushes him to the inside and sits in the flat but what does he do then? What if no one comes to the flat? Well to be honest, if no one came to the flat then covering it would be a complete waste of time, especially because that probably means another area of the field is in danger.
There is a solution to this and one of my old coaches had a saying that has stuck with me ever since. “If two don’t show, I gots to go!” What this means is, if the number two receiver does not come to the flats, the corner has to take off and help cover deep. Let’s look at how this would work:
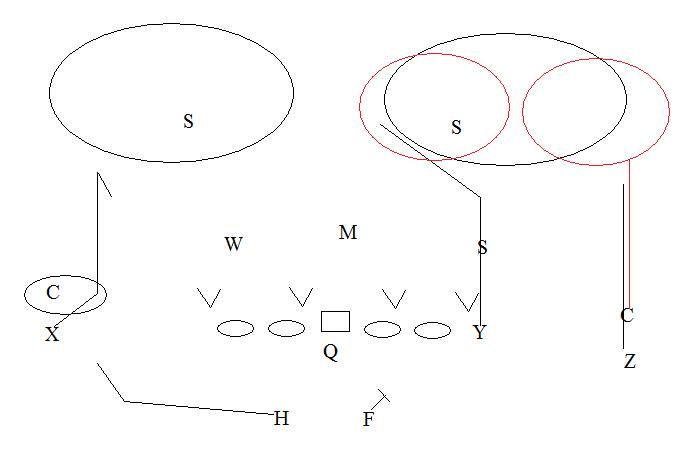
There’s a lot to take in on that image so lets break it down. First we will focus on the “X” side of the field. Here the offense is trying to run a “curl-flat” which means the “X” runs a curl and the “H” runs into the flats. What this does is put the corner in an awkward situation where he can only cover one or the other. However, in this scheme his job is to push that “X” receiver to the inside. As you can see, the “X” did not get a straight release on his route and it put him closer the Will linebacker and the safety on that side, making the window to get him the ball very tight. Now the corner can focus on the number two receiver, the “H”, because he is coming right into his zone. In this case, the basic coverage was all that was needed.
Now lets take a look at the “Z” side of the field. Here we have the “Z” running a streak up the sidelines. As the corner begins to jam the “Z”, he takes peek inside at the number two receiver, the “Y”, and sees him releasing up the field. He is not threatening the flat. In other words, “two don’t show.” Now he is free to follow the “Z” deep since number two is not endangering the flats. In other words, “I gots to go.” Now as you can see, the corner and safety on the “Z” side of the field can divide that deep half in two, allowing the safety to cover number two on his post route. The tight end (“Y”) did not threaten the flats so as a result, another part of the field was threatened. In this case, he ran a post route and threatened the deep middle of the field. Now that the corner has taken the deep sidelines, the safety is free to close in on the tight end. Between the safety and the Mike backer (who would be dropping deep if you were paying attention), the window to fit the ball to that tight end is very small.
There you have it, the basic principals of a cover 2 (or Tampa 2) coverage. There are many more details that vary from team to team but with literally thousands of coaches out there employing this coverage, the details and nuances will continue to evolve along with the whole game of football. Thanks for reading my first entry into Football 101 on AOSN. If you have any questions, comments, or want to discuss anything, please do so in the comments section.
Featured image courtesy of http://starter.com/app/assets/media/generated/2b8e101c1166cb0bd38b51bd62d8044c1382364399_blogs_blog_media.jpg?1382364411